Admin Members Management
The Members area lets admins view, add, edit, and remove team members, manage departments, locations, and positions, and control member access roles.
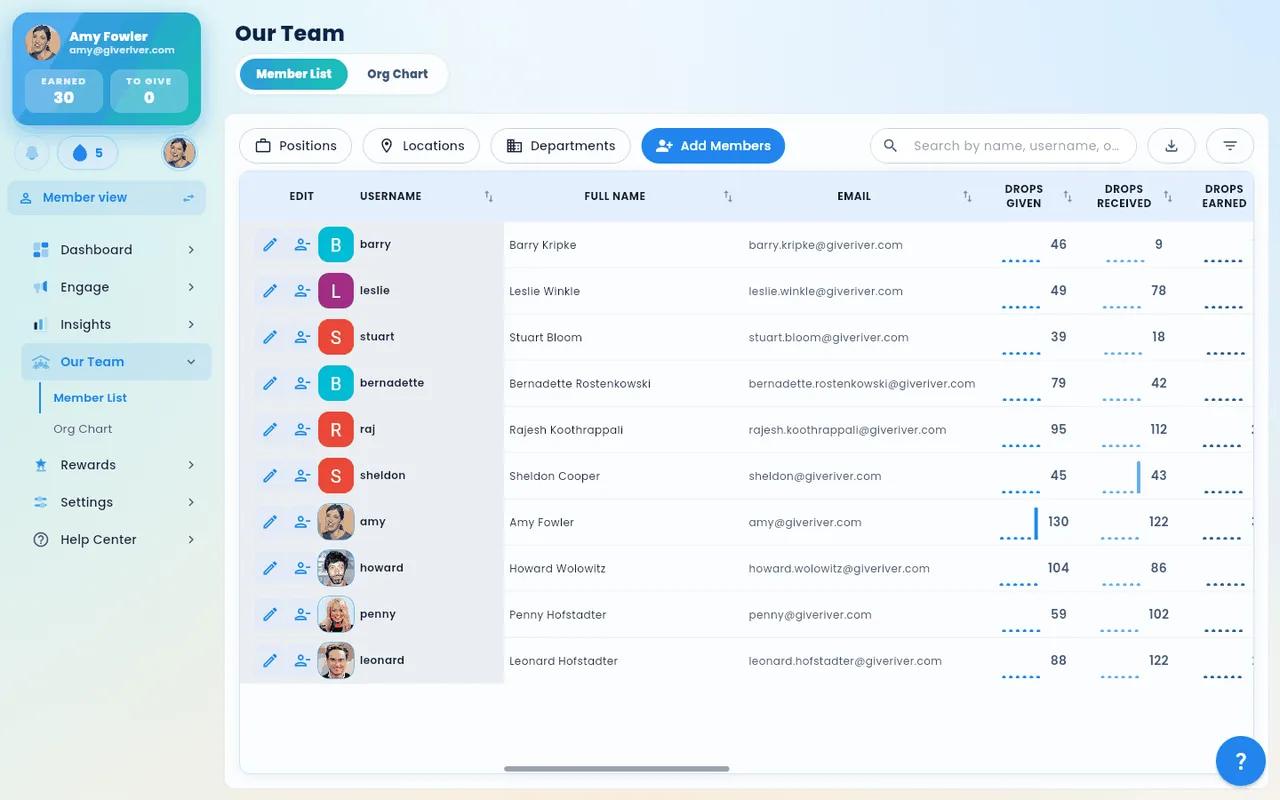
Accessing Members
In Admin view, open Our Team in the side navigation. It has two sub-sections — Member List and Org Chart — reachable from the nested side navigation or the sticky tabs at the top (see Admin Navigation). Member List opens by default and shows the full members list for your primary team.
Members List Views
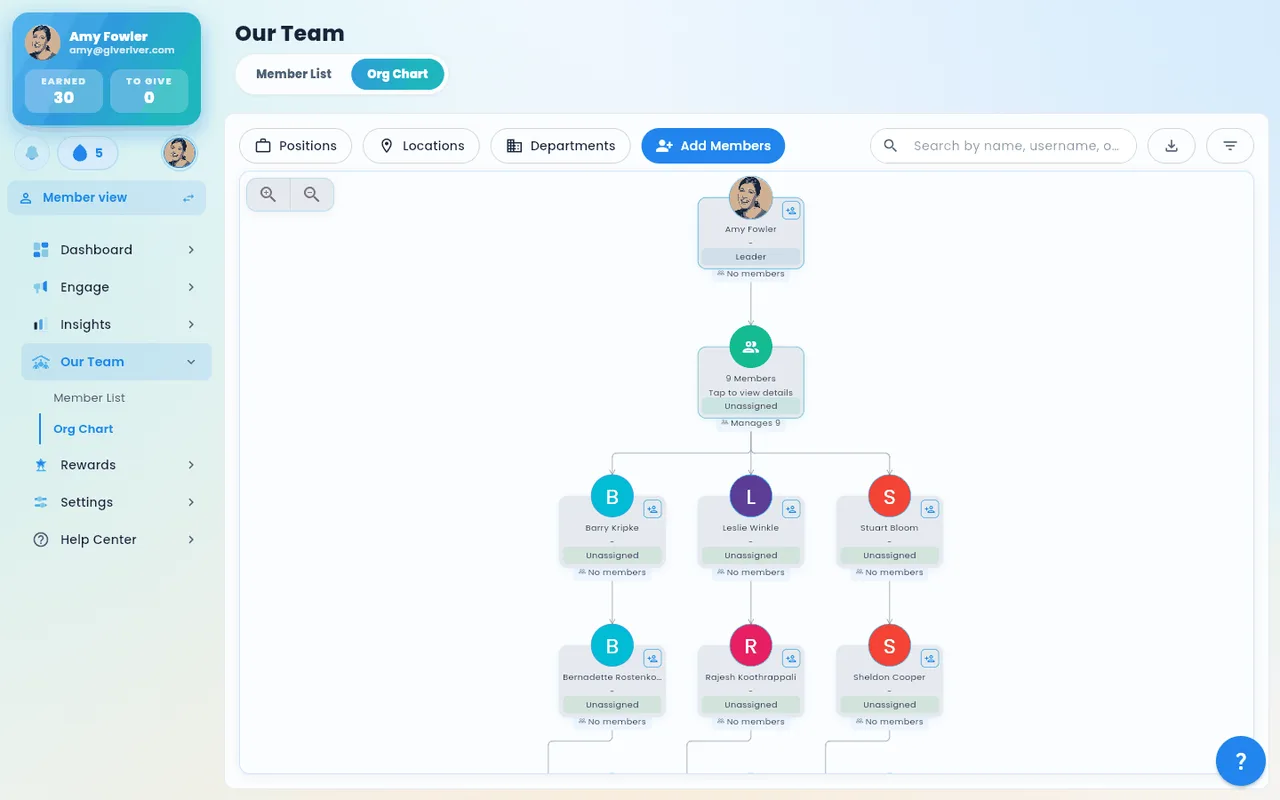
Our Team offers two views, each its own sub-section:
| Sub-section | Description |
|---|---|
| Member List | Tabular list of all members with sortable columns including name, email, role, department, location, status, and River Bank balance (accumulated redeemable drops). On mobile, this view automatically displays as a vertical list of member cards showing each member's name, role, status, and River Bank balance. |
| Org Chart | Visual hierarchy chart showing manager-to-report relationships |
Switch between them with the Member List / Org Chart tabs (or the side-nav sub-sections).
Adding a Single Member
- Click Add Member in the top-right of the Members page.
- Fill in the required fields:
- Full Name
- Username
- Email address
- Optionally fill in:
- Access Role (admin or member)
- Position (from your configured positions list)
- Department
- Location
- Manager (select from existing members)
- Joined Date
- Extra Drops (boosted drop allocation)
- Set the Member Status (active, inactive, pending, etc.)
- Click Save to create the member.
Editing a Member
- Locate the member in the table or org chart.
- Click the member's row or edit icon to open the edit dialog.
- Update any fields as needed.
- Save changes.
Changing a Member's Status or Removing a Member
Status changes and removal now live in one place: the member's edit dialog.
- Open the member's edit dialog (click their row or edit icon).
- In the Member Status section, click Change Status or Remove.
- A chooser lists every status with a one-line explanation of what it means.
- Pick the new status. Destructive choices (Removed, Deleted) ask you to confirm before anything is applied.
For a reversible access suspension, choose Inactive — the member keeps their history and can be re-activated later. Re-activating a member prompts you to set a fresh joining date.
Member Status Options
Members can be assigned a status that controls their access and visibility:
| Status | Meaning |
|---|---|
| Active | Full platform access — the member can sign in and participate. |
| Inactive | Temporarily paused — history is kept, but they can't sign in or participate. |
| Pending | Invited but not yet accepted — waiting on their first sign-in. |
| Left | Marks that the member left the organization; their history is kept. |
| Removed | Removed from the team — they lose access, but records are kept. |
| Deleted | The member's account is permanently deleted. This can't be undone. |
Pending Approvals
Members who requested to join via an invite link appear in the Pending Approvals section. To approve or deny:
- Click Pending Approvals at the top of the members list.
- Review each request.
- Click Approve or Deny for each member.
Additional Drops
To grant a member extra drops outside of the standard drop cycle:
- Open the member's edit dialog.
- Set a value in the Extra Drops field.
- Save the change.
Alternatively, use the Additional Drops dialog (accessible from the member row menu) to add a one-time supplemental allocation with a reason note.
Departments, Locations, and Positions
These reference lists are managed separately within the Members area:
- Departments — navigate to the Departments sub-section to create, rename, or delete departments.
- Locations — navigate to Locations to manage office or remote work locations.
- Positions / Roles — navigate to Positions to manage job titles assigned to members.
These values are selectable when adding or editing a member and are also used as filters on the members table.
Inviting Members via Email
- Click Invite at the top of the Members page.
- Enter one or more email addresses in the invite dialog.
- Optionally assign a role and team before sending.
- Click Send Invitations. Each recipient receives an email with a link to join.
Exporting Members
The members table supports CSV export. Click the Export button above the table to download the current member list with all visible columns.
Per-Member Drop History
Open any member's row to access their Drop History — a paginated table of every drop they've sent and received, useful for spot-checking activity, investigating disputes, or auditing manual adjustments.
- Server-side sorting — clicking a column header sorts the full result set, not just the visible page, so the top entry is genuinely the newest/oldest across the member's whole history.
- Filters — narrow by transaction type (recognition, season reward, manual adjustment, etc.) and date range.
- Each row links back to the originating post (recognition drops) or to the season/adjustment context when applicable.
Showing Historical Members
By default, the Members table hides historical members (those who have left the team, been deactivated, or are otherwise no longer active) so the list reflects your current roster.
- Toggle Show historical at the top of the table to include them. The row count badge updates.
- Historical members are read-only — you can view their profile and drop history, but most edit actions are disabled. Removing the toggle hides them again without affecting any data.
Did this article help?
Related articles.
See the platform in action.
30-day free trial. No credit card. River Guide included on Core and Growth.